[ SDF Public Access UNIX System .. Est. 1987 ]
join welcome faq status members projects store tour gopher abuse dialup minecraft social
tilde nihongo europa webmail gallery usermap irc tutorials telnet git ssh
Connecting to the SDF VPN with PPTP
Connecting to the SDF VPN with PPTP
Contents
Overview
The Virtual Private Network (VPN) provided by SDF has a number of uses. The most beneficial of that is to allow confidential communication over a public network. Basically, the SDF VPN will allow you (once routing is enabled) to communicate securely over an insecure connection such as a public Wireless Fidelity (Wi-Fi) network.
The major benefit of this over SSH forwarding/tunneling is that it is much easier to configure and automatically tunnels all connections leaving your computer, and not just those specifically configured for forwarding. Some may see this as a negative aspect of the VPN, however.
Setting it up
The SDF VPN is quite easy to set up. You must first choose a VPN plan that is right for you, based on assumed bandwidth usage. Pricing and more package information is available through the shell by typing 'vpn' without the quotes.
Once you've been added to the VPN membership level (you'll receive an email notification of this), you must set up your VPN access by typing 'setvpn' in the shell, without quotes. This will allow you to configure your VPN secret (password) for connecting.
You should make note of the VPN's IP address when setting up your secret.
Once you've configured your VPN account, it's time to connect. Continue reading below for step-by-step instructions on connecting to the VPN.
Connecting in Windows XP
- Open the Windows Control Panel.
- Open the Network Connections item in Control Panel. Generally you would click the "Network and Internet Connections" option, then click "Network Connections". A list of existing dial-up and LAN connections will be displayed.
- Click on the "Create a new connection" option from the left-hand side of the window. The Windows XP New Connection Wizard will come up.
- Click the "Next" option to begin the wizard. Then choose the "Connect to the network at my workplace" option from the list and click "Next".
- On the Network Connection page of the wizard, choose the "Virtual Private Network connection" option and click "Next".
- Choose a name for this connection on the "Connection Name" screen. Windows will use this to reference the VPN connection.
- Choose an option on the "Public Network" screen and click "Next". The default option, "Automatically dial this initial connection" can be used if the VPN connection will always be initiated when the computer is not already connected to the Internet. Otherwise, choose the "Do not dial the initial connection" option. This requires that the public Internet connection be established first, before this new VPN connection will be initiated. Choose this option.
- Enter the IP address for the VPN on the "VPN Server Selection" screen. This is obtained via the 'setvpn' command (without quotes) in the shell.
- Choose an option on the "Connection Availability" screen and click "Next". The default option, "My Use Only", ensures that Windows will make this VPN connection available only to the user that is currently logged in to the computer. If you don't want this, select the "Anyone's use" option.
- Click "Finish" to complete the wizard. You may wish to select the option to create a desktop shortcut for easy access. The information for the VPN connection will be saved for current and/or future use.
Connecting in Windows Vista
Connecting to the VPN is slightly different in Windows Vista. Please use these instructions to connect to SDF's VPN through Vista.
- Click on the "Start" button and then choose "Connect to".
- Click on the "Set up a connection or network" option on the window that follows. It's near the bottom.
- On the window that comes up, scroll down and click on the "Connect to a workplace" option. Then click "Next".
- A question asking "Do you want to use a connection you already have?" may appear. Select "No, create a new connection." if it does and then click "Next".
- Next you'll be asked "How do you want to connect?" Select "Use my Internet connection (VPN)".
- You'll then be asked for the Internet address. Enter the address you remembered when accessing 'setvpn' (without quotes) in the SDF shell.
- Enter a name for this VPN connection in the "Destination name:" field. This is how Windows Vista will reference the VPN.
- If you don't want to connect immediately, check the "Do not connect now; just set it up so I can connect later." option.
- Do not check the "Use a smart card." option.
- When finished, click "Next"
- You'll then configure the username and password needed to authenticate to the VPN. The username is your SDF username and the password is the secret you set up via the 'setvpn' command in the shell.
- Leave the "Domain" field blank.
- Click the "Create" button once you are done. You should then see a window pop up saying that "The connection is ready to use." Click on "Close".
Connecting in Linux
- Make sure PPP and PPTP are installed. The can be accomplished in Debian or Ubuntu by entering 'sudo apt-get install pptp-linux' into a terminal.
- Create a file named sdfpptp in /etc/ppp/peers by entering 'sudo gedit /etc/ppp/peers'. Replace gedit with your choice of text editor. Add the following to the file: (Be sure to replace username with your username.)
Note: Make sure to replace IP Address with the IP address/hostname provided when running 'setvpn' in the shell.
remotename sdfpptp
linkname sdfpptp
ipparam sdfpptp
pty "pptp --loglevel 0 IP Address --nolaunchpppd"
name username
refuse-eap
refuse-pap
refuse-chap
refuse-mschap
require-mppe
nomppe-stateful
require-mppe-128
nomppe-40
noauth
nodetach
lock
bsdcomp 9,15
deflate 9,15
idle 0
- Save the file.
- Edit /etc/ppp/chap-secrets by entering 'sudo gedit /etc/ppp/chap-secrets'. Add the line username stfpptp password * replacing username and password with your SDF username and your password set by 'setvpn'.
- Make sure a specific route to the VPN exists. Run 'sudo route add VPN-IP gw GW-IP' replacing VPN-IP with the IP address/hostname provided when running 'setvpn', and replace GW-IP with your gateway IP address. If you do not know the IP address of your gateway, enter 'route'. It is the gateway IP next to the destination default.
- Enter 'sudo pppd call sdfpptp' into a terminal. Wait for it to show the local and remote IP addresses. You should now be connected. Do not close the terminal until you are ready to disconnect.
- Open another terminal. Enter 'sudo route add -net 192.94.73.0/24 dev ppp0'. This will route all your connections to SDF through the VPN.
Alternatively to steps 5 and 6, you might use a wrapper script like this:
#!/bin/bash
SDFVPNHOST=IP Address
RT=`ip route get $SDFVPNHOST | head -1`
DEV=`echo $RT | awk '{while ($num != "dev") {num++}{print $(num+1)}}'`
VIA=`echo $RT | awk '{while ($num != "via") {num++}{print $(num+1)}}'`
ip route add $SDFVPNHOST via $VIA dev $DEV
ip route add $SDFVPNHOST via $VIA dev $DEV table sdftun
pppd call sdfpptp
ip route del $SDFVPNHOST via $VIA dev $DEV
ip route del $SDFVPNHOST via $VIA dev $DEV table sdftun
This automatically detects the default gateway and adds appropriate routes, starts the VPN and deletes the routes after VPN has been
stopped. If you do not use a custom routing table dedicated to the SDF VPN you should delete the lines ending in "table sdftun".
GUI Setup With NetworkManager
Any of the newer Linux distros that use
NetworkManager (Debian, Ubuntu, Fedora, etc.) on their
default desktops have a GUI interface to PPTP VPN
configuration. You'll need to install a package to get
this capability (although this now seems to be included in the
latest Ubuntu 10.10 release):
Fedora:
yum install NetworkManager-pptp
Debian/Ubuntu:
apt-get install network-manager-pptp
Once installed, restart the NetworkManager service
(/etc/init.d/NetworkManager
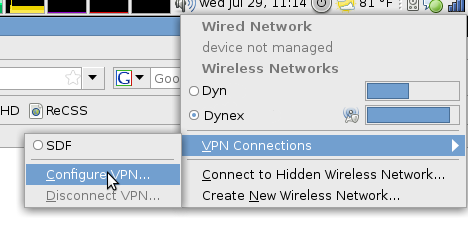
restart) and left-click on the network
manager icon in your
taskbar. Highlight VPN
Connections and click
on Configure
VPN:
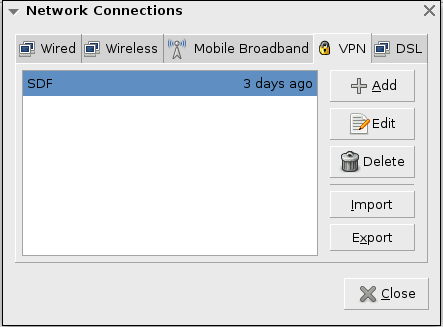
Click on
the Add
button, and
choose Point-to-Point
Tunneling Protocol (PPTP), then click
Create. Fill out the User
name, Password
and Gateway
fields with appropriate values
(from when you
ran setvpn):
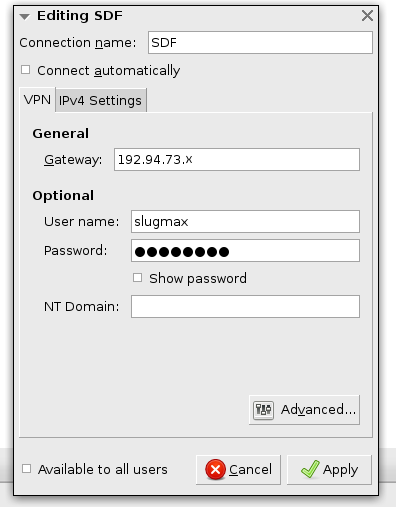
Now click on
Advanced:
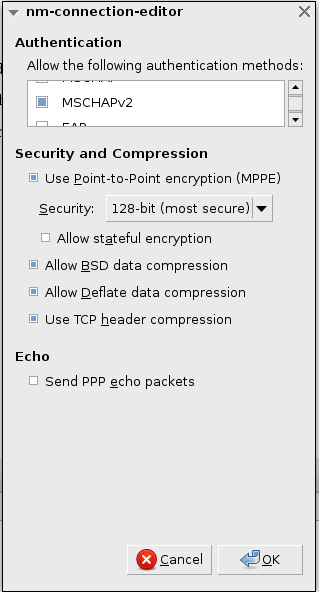
Under
Authentication, de-select
all the methods except MSCHAPv2. Then select
Use Point-to-Point Encryption (MPPE) and choose
128-bit (most
secure) in
the Security
dropdown. Click OK, then Apply
and close all other configuration dialogs. Now when
you left-click on the network manager icon, you
should have your PPTP VPN listed
under VPN
Connections. Just select it and wait. If it
is successful, you'll see a little lock icon appear
over the usual network manager icon. If not, check
your system log for errors. This will
be /var/log/messages
or /var/log/syslog,
depending on your distro.
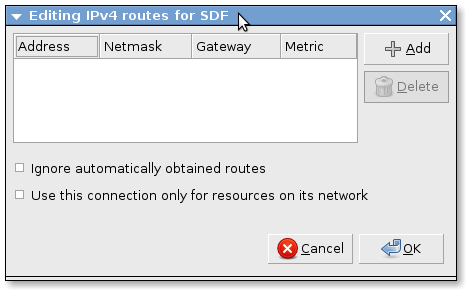
A Note on Routing
If you use network manager, all traffic will be
routed through the PPTP VPN for you once you are
connected. If that's not what you want, you can
click on IPV4
Settings and
then Routes
to have simple static routes added for you
automatically when the VPN connects. You can also
check Use this
connection only for resources on this
network, which in our case means only
connections to SDF hosts will be encrypted.
Connecting in FreeBSD
- Install mpd4 from ports or packages.
- Add the following section to your /usr/local/etc/mpd4/mpd4.conf:
sdfvpn:
new -i ng1 sdfvpn sdfvpn
set iface disable on-demand
set iface idle 0
# disconnect the client after 8 hours
set iface session 28800
set iface route 10.0.0.0/24
set iface route default
set bundle disable multilink
set auth authname "USERNAME"
set auth password "PASSWORD"
set link yes acfcomp protocomp
set link no eap
set link no pap
set link accept chap
set link mtu 1460
set link keep-alive 10 75
set ipcp yes vjcomp
set ipcp ranges 0.0.0.0/0
set ipcp yes req-pri-dns req-sec-dns
#
# The five lines below enable Microsoft Point-to-Point encryption
# (MPPE) using the ng_mppc(8) netgraph node type.
#
set bundle yes compression
set ccp yes mppc
set ccp yes mpp-compress
set ccp yes mpp-e128
#set bundle accept crypt-reqd
set ccp yes mpp-stateless
open
- You will have to replace three (3) things in this config:
- Your USERNAME
- Your PASSWORD
- The local address of SDF's VPN host. This can be found in /etc/hosts on SDF. The local IP will start with 10.0.0, but have the same last octet as the public IP.
' - Add this in your /usr/local/etc/mpd4/mpd4.links file:
sdfvpn:
set link type pptp
set pptp peer
set pptp enable originate outcall
set pptp disable incoming
- You will have to replace one (1) thing in this config:
- The public address of SDF's VPN host. You can get this by running setvpn at the shell.
- Now, as root, run mpd4 sdfvpn.
- You should now be connected to SDF over a layer 3 tunnel across the Internet.
- Your new routes are only for SDF's hosts, and use their internal IP addresses. These are the 10.0.0.x ones. I'm working on how to route to the public ones over the VPN without creating a routing loop to the VPN host. I copied SDF's /etc/hosts file to my machine so that I can run 'ssh sdf1' to connect through the tunnel.
Connecting in Mac OS X
- Open /Applications/Internet Connect.app
- Click on the VPN button.
- Click on the Configuration dropdown and go to "Edit Configurations..."
- Press the + button at the bottom left of the window to add a configuration.
- Under "Description" put whatever you want. SDF VPN is a good choice.
- Under the "Server Address," Enter the IP address for the VPN on the "VPN Server Selection" screen. This is obtained via the 'setvpn' command (without quotes) in the shell.
- Under Username put your SDF username and the password is the secret
you set up via the 'setvpn' command in the shell.
- Choose "Automatic" encryption.
- Click "OK".
- Then, whenever you want to connect you can return to this Internet Connect Application and go to the VPN, choose the SDF VPN and click connect. Optionally, you can click "Show VPN status in the menu bar" and you can connect to the VPN from the menu bar icon.
Connecting On An iPad
- Log into SDF and run the 'setvpn' command.
- Hit 'p' to set up your password.
- Enter your password twice. The password must be 14 characters or less, and ideally should contain letters, numbers, upper and lower case, and a special symbol, though there are no actual complexity requirements.
- After you have set up your password, the setvpn wizard will tell you what IP address to connect to. It will be 192.94.73.X. Write this whole IP address down. You will need it in a later step.
- Hit 'q' to exit the configuration.
- Turn on your iPad and go to the Settings.
- Go into the Network subsection.
- Go into the VPN subsection. This will bring up the 'Add Configuration' window.
- Select "PPTP" at the top.
- In the Description field, label this connection something useful to identify it, such as 'SDF VPN'.
- In the 'Server' field, put in the IP address that you wrote down earlier.
- In the 'account' field, put your SDF user name.
- In the 'Password' field, put the password that you set up while running the setvpn wizard in the set above. This will cause the iPad to remember your password for you. If you wish to type it in each time you connect, leave this field blank.
- Set the encryption level to 'Maximum'
- Leave the 'Send All Traffic' slider set to 'On', unless you specifically want to (and know how to) set up VPN usage in individual applications.
- Hit the 'Save' button at the top
- To turn on VPN, slide the VPN slider to 'On' for the connection called SDF and open the browser. Connect to http://whatsmyip.org and verify that the IP address it shows as your source.
The wrap-up
Now that you have your VPN configured to connect, make sure that you don't forget to use it! Using the VPN while connected through a public access network (or even your home network!) will tunnel all connections through SDF and out to the Internet (once routing is enabled). Please make sure to use the VPN responsibly, as all actions and activity will be traced back to SDF.
Enjoy!
$Id: PPTP.html,v 1.2 2011/06/15 15:51:32 avoyager Exp $
©1987-2065 SDF Public Access UNIX System, Inc. 501(c)(7)
(this page was generated using ksh, sed and awk)