Hacking the Skylanders Portal of Power to run on USB power
(Originally posted 2012-01-28 on my now-deleted Comcast blog)
My kids received the Skylanders Spyro’s Adventure Starter Pack for Nintendo Wii for Christmas. This game incorporates the use of character figurines that interface with a “Portal of Power” to represent in-game players. The figurines each contain their own chip so that players can retain their status, upgrades, level, skills, etc. even if they take their figurines over to a friend’s house to play. The Portal of Power is essentially an RFID reader/writer with some cool multicolor LED lighting effects. It adds a neat dimension to the game and we all enjoy playing it.
The Portal for the Nintendo Wii supports only wireless operation through a small USB wireless adapter included with the kit. The Portal itself operates on 3 AA batteries. While this design makes for less clutter and more convenience (you often have to swap players frequently when battling bosses, for example), the Portal mows through batteries like Joey Chestnut mows through hot dogs (or Takeru Kobayashi, if you prefer). We went through several sets of batteries just in the days between Christmas and New Year’s Day. It bothers me a lot to throw away so many batteries. Since the Wii has two USB ports, I decided that I would try to hack the Portal to operate on the USB power from the other port. USB power is 5V and 3 AA cells yield 4.5V so I did not see a problem doing so.
WARNING!!! WARNING!!! WARNING!!!
THERE IS A VERY REAL POSSIBILITY THAT YOU COULD PERMANENTLY DAMAGE YOUR PORTAL OF POWER BY ATTEMPTING THIS MODIFICATION! THIS WILL ALMOST CERTAINLY VOID ANY WARRANTY ON THE DEVICE! YOU SHOULD PROBABLY NOT ATTEMPT THIS IF YOU DO NOT HAVE BASIC SOLDERING SKILLS.
Despite that genuine warning, the procedure really is easy if you have basic soldering skills. Here’s what I did:
- First, I took a spare mini-USB cable that I had lying around and cut off the mini end. I chose one with a fairly thin cable to avoid making the Portal unlevel when I was finished. I’ll explain more about this later.
- Next, I stripped about 1.5" of the outermost insulation from the USB cabled and clipped the white and green wires all the way back to the hilt of the cable. The white and green cables are for USB data, and we only want to use the red and black cables so it makes sense to get the other two out of the way.
- One of my goals was to make as few permanent modifications to the Portal as possible so I wanted to avoid soldering the wires to any of the conductors in the battery compartment even though that approach would have been cleaner. I wanted something with solder tabs and the exact dimensions of a AA cell so that I could just drop them into the compartment. Fortunately, I had some old, dead Ni-Cd cells lying around from a cordless phone battery. These even had metal tabs soldered to them already for the connection to the charging station. I stripped the red and black wires on the USB cable and soldered them to the tabs.
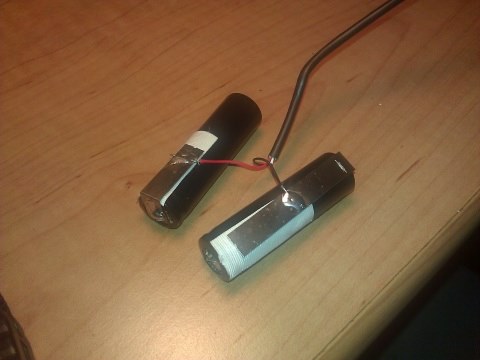
USB cable soldered to old NiCd cells
- You need to be careful of the polarity. Make sure to solder the black wire to the tab that will ultimately touch the negative side ("-") of the input to the Portal, and the red wire to the positive ("+"). Keep in mind that since we’re only inserting two cells, there is no current flowing through them. This condition is what makes it relatively safe to use these old cells as placeholders.
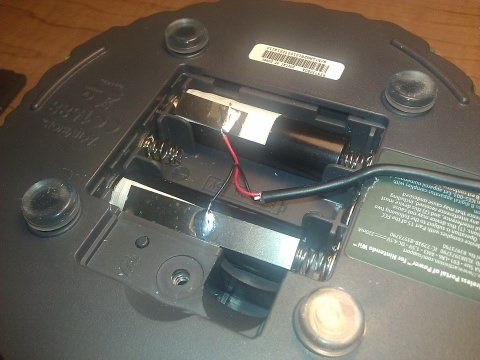
Cells in place in the Portal
- One minor kludge I had to do: since the NiCds were originally contained in their own little pack, the cells didn’t have the typical nub on the anode that you’re accustomed to seeing on AA batteries. I added a little solder blob on the anode so that it would make good electrical contact in the battery compartment. If you’re using a different surrogate cell than I did, you may not have to do this step.
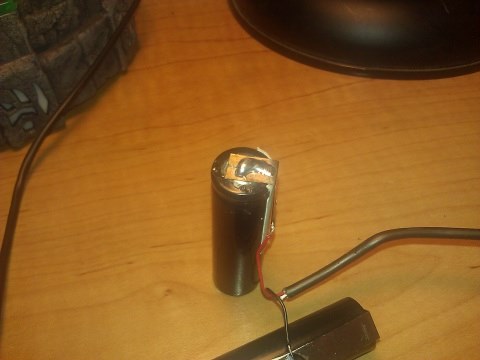
Solder blob on anode
- At this point, I was nearly done. I plugged the cable into the other USB port, measured the voltage with my meter. After checking that it was right, I inserted the cells into the Portal and powered it up. It worked without any problems.
- This last step is the only one which caused any permanent change to the Portal. I wanted the cable to run smoothly under the Portal even when the battery compartment cover was on. I had to drill a small hole at the edge of the battery cover for the cable to exit. I also shaved a small amount of plastic away from the housing on the contacting surface to smooth out the transition a little more. Even if you’re successful at this step, the Portal may still rest on the cable a bit and wobble slightly when resting on a tabletop. If this is a problem, you can try getting a pack of rubber feet from a craft store and sticking them to the original feet of the Portal as you can see in the images below.
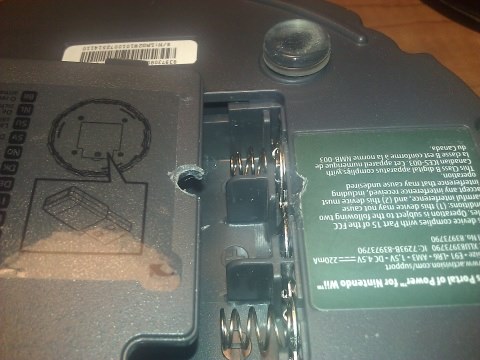
Small hole drilled in the battery cover
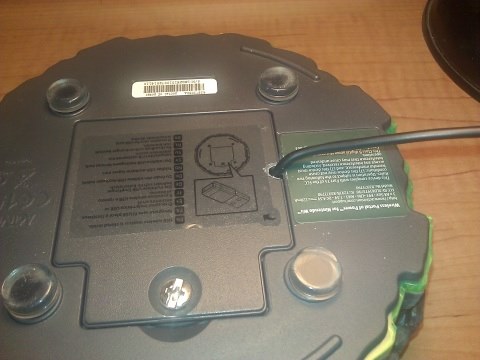
Reassembled with cable running through battery cover; rubber feet added
After doing this modification, our Portal has been running perfectly on USB power with no need to keep changing batteries! Good luck if you attempt to do this on your own! Feel free to leave a comment letting me know how it went for you.