
This is a tutorial for setting-up the Plan 9 from Bell Labs operating system in a VPS slice on SDF. The tutorial was aimed at participants in the SDF Plan 9 Boot Camp, but should also be useful to other SDF VPS users.
Plan 9 has active communities which mostly interact by email.
SDF hosts the plan9-l mailing list for participants in the Plan 9 Boot Camp. Email 'majordomo' and 'subscribe plan9-l' to join
After you VPS application (as either a Boot Camp participant or
regular VPS user) has been processed, you will be sent an e-mail
that indicates the host name of your VPS maintenance server (for
example, vps9.sdf.org).
From your SDF shell, use the command ssh vps9.sdf.org (or
the VPS maintenance host indicated in your e-mail) to connect to your
VPS Maintenance Shell.

Make a note of your virtual machine's IP address, which is displayed in the header of the VPS Maintenance Shell menu (circled in red in Figure 2.).
(Note: After each maintenance shell command has been executed,
the system will prompt you with (continue). Press the
Enter key and the menu will be redisplayed.)
At the menu Command: prompt enter: x (Clean
install).
When prompted Do you wish to continue? (yes/no), enter
yes. The install process will take about ninety seconds.
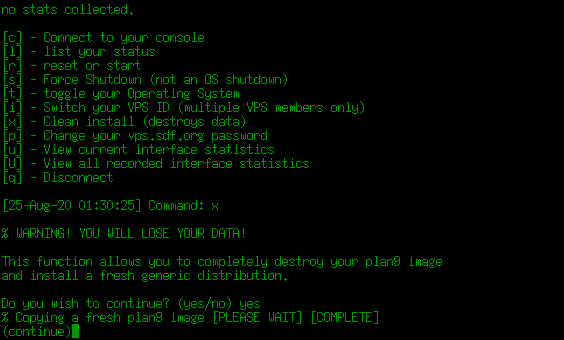
Press Enter to return to the maintenance shell menu.
At the menu prompt enter: r (reset or start).
At the root is from …: prompt, press Enter.
At the user[none]: prompt, enter glenda, the
built-in user.
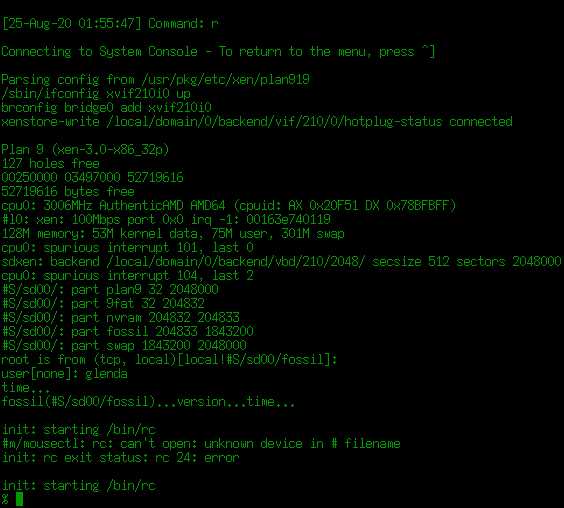
You are at the Plan 9 console rc shell (the
% prompt).
At this point, your Plan 9 server is up and running. At any time, you
can return to the VPS Maintenance Shell by typing Ctrl-], leave
the maintenance shell by typing q (Disconnect) at the
Command: prompt, and your server will continue to run until
you issue a shutdown command (At the VPS Maintenance Shell enter
s, or in rc enter fshalt).
To return to the console rc shell, log-in to the VPS
Maintenance Shell again, type c (Connect to your console)
at the Command: prompt, then press Enter for a
% prompt.
In this step you will configure your Plan 9 server for networking and to allow connections from Drawterm, the graphical Plan 9 client that you will run on your PC.
You will configure your server by entering commands at the console rc shell. Rc shares many commands in common with the Unix Bourne shell on which it is based. For a guide to basic rc commands, see Plan 9 Rc Survival Guide. (The functionality of the console version of rc is limited compared to the full version which requires the rio graphical user environment, which will be provided by Drawterm.)
If you have shutdown your Plan 9 server, restart it as in step 1.d. Start Plan 9 above and log-in as user glenda.
|
(1) |
Replace your-IP with the IP address you recorded from the header of the VPS Maintenance Shell in step 1.b. VPS Maintenance Shell log-in.
|
(2) |
|
(5) |
Replace password with the password you want to use when user glenda connects to your Plan 9 server using Drawterm.
|
(6) |
Basic configuration of your Plan 9 server is now complete.
You may exit the Plan 9 console (Ctrl-]) and the VPS Maintenance Shell
(q) and your server will continue running.
If you restart your server (use rc command fshalt,
then the VPS Maintenance Shell command r), you will have to
reenter (1), (3), (4), (5), and (6) above.
To make your server configuration persistent over restarts, see section
5. Making Your Server Configuration Permanent.
Drawterm is a graphics terminal emulator that you run on your client PC. Drawterm implements the rio Plan 9 windowing system and connects to your Plan 9 server.
Download and install Drawterm on your PC. Drawterm is available as a package for many Linux-based distributions — check your package manager. Source code and precompiled binaries for several operating systems are available from https://swtch.com/drawterm/. Building instructions for NetBSD are here.
Start Drawterm on your client PC with the following command line arguments:
|
(7) |
Replace your-IP with the IP address you recorded from the header of the VPS Maintenance Shell in step 1.b. VPS Maintenance Shell log-in.
Drawterm will display the Plan 9 log-in screen.
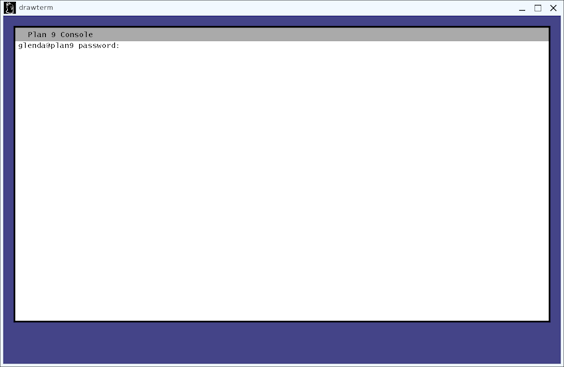
Type the password you set for user glenda in (5) then press Enter. (No cursor will be displayed and the entered password will not be echoed on the log-in screen.)
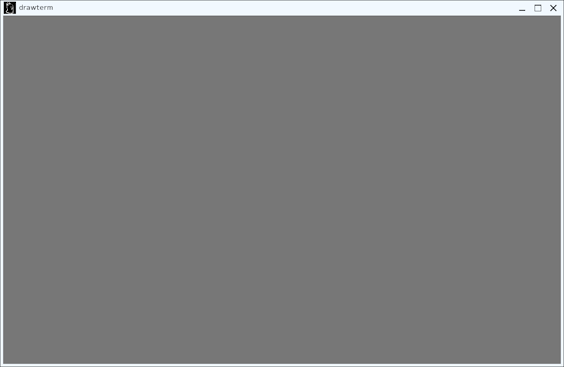
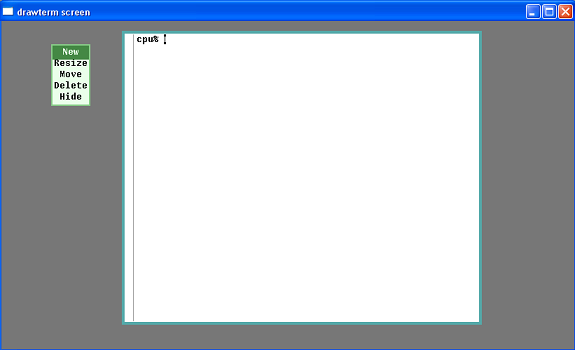
If your log-in is successful, Drawterm will connect to your Plan 9 server and start the rio window manager with an empty desktop.
Right-click and hold anywhere on the rio desktop to open the pop-up menu ("New/Resize/Move/Delete/Hide"). Continue holding down the right mouse button, move the pointer over New, then release the mouse button.
When the mouse pointer changes to a "+" cursor, right-click and hold on the desired position for the terminal window's upper-left corner, drag the mouse to the desired position for the window's lower-right corner (a red frame will appear to indicated the new window's border), then release the mouse button.
rio will create a terminal window and run rc.
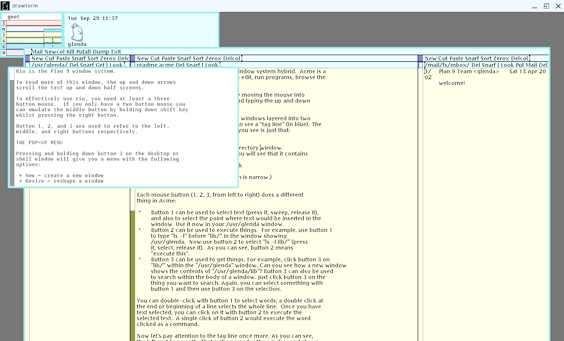
The built-in glenda user account includes a script, riostart, that creates a demonstration rio
session by starting several common Plan 9 programs:
readme.acme,
a tutorial explaining basic acme usage.readme.rio, a tutorial on rio and
rc will be printed in the terminal window.To run riostart, enter the following command in a terminal window:
|
(8) |
To bring a partially hidden window to the foreground, left-click anywhere in the window.
As mentioned in section 2. Plan 9 Server Configuration, most of the configuration performed (1), (3), (4), (5), and (6) in that section will be lost if you restart your Plan 9 server.
To make the server configuration persistent over restarts, you
have to add the configuration commands to the file
/rc/bin/termrc.local.
This can be accomplished by entering the following rc commands
at either the Plan 9 console of your VPS Maintenance Shell, or a
rio terminal window.
(Enter the commands while logged-in as user glenda.)
|
(9) |
') characters and
not double-quotation (") characters at two positions in (12).Alternatively, you may add the commands (1), (3), (4), (5), and (6) to
/rc/bin/termrc.local with a text editor
— either acme, the graphical editor, if you are running
rio in Drawterm, or ed,
the line-oriented text editor, in either rio or the Plan
9 server console.
After you have familiarized yourself with Plan 9 using the built-in user glenda, you may wish to add a user to your system (this is optional).
Enter the following commands in a rio terminal window or the Plan 9 server console:
|
(14) |
|
(15) |
Replace user with the desired name for the new user.
Type Ctrl-\, then at the >>> prompt
enter q.
Set the Drawterm password for the new user using command (5), substituting the new user name for "glenda" and the desired password for password.
Restart Drawterm using command (7), substituting the new user name for "glenda". Enter the new user's password at the Plan 9 log-in screen.
Open a terminal window and enter the following command:
|
(17) |
Set your Plan 9 server's time zone to your local time zone.
fshalt (rio
terminal window or server console).r
command).cd /adm/timezone.lc.local with the command cp your-zone local/rc/bin/termrc and set the environment variable
TIMESYNCARGS to (-n pool.ntp.org).fshalt
and restart.Drawterm automatically mounts your client PC's file system at
/mnt/term in your Plan 9 namespace.
This can be used to copy files from your PC into Plan 9, or from Plan
9 to your client PC using normal file copy commands (cp
in rc).
You can also transfer files between your Plan 9 server and your SDF shell account via the SDF FTP server.
From your Plan 9 terminal window, enter the command:
|
(18) |
In your Plan 9 namespace, Plan 9-related files on the FTP server are in
the directory /n/ftp/pub/sdf/plan9/.
From your SDF cluster shell account that directory is accessible at
/ftp/pub/sdf/plan9/.
Contents of note (paths are relative to Plan 9 root directory above):
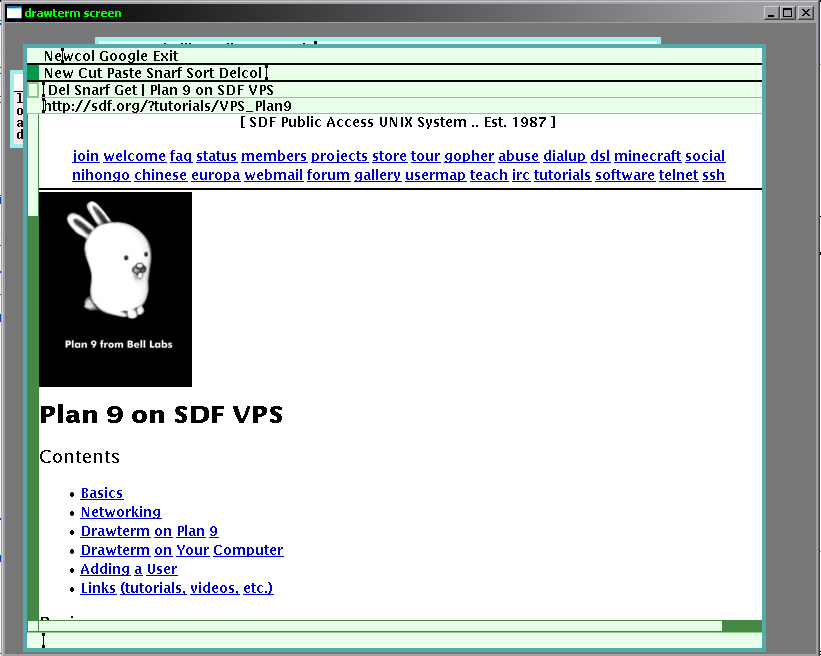
contribdist/9*.tar.gzdist/9front/plan9bunnysmblack.jpgYou can use Abaco to browse the web. (Abaco is available in a default Plan 9 system.)
|
(19) |
|
(20) |
When abaco starts, you can go to a webpage by clicking "New"
with the middle button of the mouse, typing the address in the row below the
one with "Del Snarf Get …" (see the previous figure:
it's the one where the current address is), and pressing "Enter" on your
keyboard. You can follow links by clicking on them, as is usual, with the
left button (the shape of the cursor won't change, though).
The version of webfs in the VPS Plan 9 image does not support HTTPS Web pages.
SDF periodically runs a Plan 9 Boot Camp which is open to anyone with an SDF user account. This Plan 9 Boot Camps are announced on the bboard and are typically a seasonal quarterly occurrence and run for 3 months.
In 2009 SDF moved to running 9xen-pae thanks to work done at Sandia/Los Alamos. Since then 9front has made significant improvements and SDF moved to using 9front pc64 exclusively in 2020.
Activities of the SDF Plan 9 Boot Camp include:
[Details on each of the above mini-projects should be expanded into its own section, or separate tutorial. Some of the mini-projects overlap with content earlier in this tutorial.]
During the SDF Plan 9 Boot Camp you are encouraged to make screenshots and videos of your Self Guided Discoveries and share your experiences on plan9-l to inspire others to do the same.